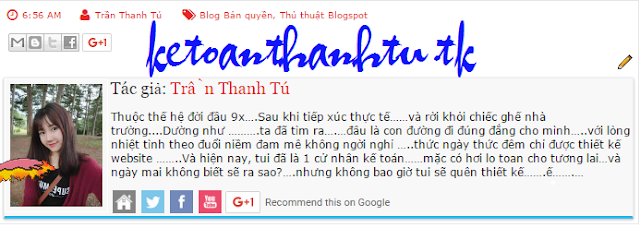
Author box là một khung tác giả dùng để giới thiệu sơ qua tác giả. Đối với template BMAG mà mình đang sử dụng thì nó đã có sẵn rồi, nhưng lại đối với vài template khác thì không có nên hôm nay mình sẽ hướng dẫn các bạn.
Trình tự các bước như sau:
Bước 1: Các bạn vào Blogger >> Mẫu >> Chỉnh sửa HTML >> Tìm đến thẻ: ]]><
Bước 2: Thêm toàn bộ css sau vào trước thẻ: ]]><
123456789101112131415161718192021222324252627282930313233343536373839404142.author-box {
  background:#F8F8F8;
  margin-top:8px;
  overflow:hidden;
  border:1px solid #eee;
  border-bottom:3px solid #37B8EB;
  box-shadow:0 1px 3px 0 #B5B5B5;
}

.avatar-author {
  float:left;
  margin-right:3px;
  border:1px solid #FFF;
  padding:5px;
}

.info-author {
  width:100%;
}

.info-author h2 {
  font-size:18px;
  margin:0 !important;
  color:#333;
}

.author-social {
  margin-top:5px;
}

.author-social a {
  opacity:.7;
  margin-left:2px;
}

.author-social a:hover {
  opacity:1;
}

.author-social a img {
  width:25px;
}
Bước 3: Thêm toàn bộ code sau vào nơi bạn muốn hiển thị (có 2 trường hợp cho bạn lựa chọn bên dưới nhé)
123456789101112131415161718<div class='author-box' itemprop='author' itemscope='itemscope' itemtype='http://schema.org/Person'>
<img class='avatar-author' height='100' src='http://www.upsieutoc.com/images/2016/08/06/13724104_10208355869508175_60606223156817640_o.jpg' width='100'/>
<div class='info-author' itemprop='description'>
<h2><i aria-hidden='true' class='fa fa-user'></i> Tác giả: <a href='https://www.facebook.com/' target='_blank'><span itemprop='name'> Tên quản trị viên <i aria-hidden='true' class='fa fa-check-circle'></i></span></a></h2>
<p>Chào mừng bạn đã đến với Blog của tôi. Website chia sẻ Thủ Thuật - Phần Mềm - Ảnh Đẹp - PSD tổng hợp, ... được cập nhật liên tục. Mong được mọi người quan tâm.</p>
</div>
<div class='author-social'>
<a href='https://www.vanthangit.tk' target='_blank' title='Website'><img alt='' src='https://lh5.googleusercontent.com/-bTOvDNpc0Dc/VLTozXJQURI/AAAAAAAAAq0/bGzWE4TNUx0/s32-no/author_site.png'/></a>
<a href='http://twitter.com/' target='_blank' title='Twitter'><img alt='' src='https://lh3.googleusercontent.com/-MI9V5yoYGkg/VLToz5h-b3I/AAAAAAAAAq4/o-axGVMet5E/s32-no/author_twitter.png'/></a>
<a href='http://facebook.com/vanthangblog' target='_blank' title='Facebook'><img alt='' src='https://lh4.googleusercontent.com/-z_Icq6321-Q/VLToxhma_pI/AAAAAAAAAqU/JzgC9MNsKqg/s32-no/author_facebook.png'/></a>
<a href='https://plus.google.com/' title='Google Plus'><img alt='' src='http://www.upsieutoc.com/images/2016/05/14/Untitled-35f472.png' target='_blank'/></a>
<a href='https://www.youtube.com' target='_blank' title='Youtube'><img alt='' src='https://lh5.googleusercontent.com/-b4Li72ENuZc/VLTo0XsqZeI/AAAAAAAAAq8/9cyjb-ud72U/s32-no/author_youtube.png'/></a>
<script src='https://apis.google.com/js/platform.js'>
  {lang: 'vi'}
</script>
<div class='g-plusone' data-annotation='inline' data-width='300'></div>
</div>
</div>
+ Trường hợp 1: Bạn muốn chúng xuất hiện dưới tiêu đề thì:
Tìm dòng
1<div class='post-header'>
Hoặc dòng
1<div class='post-header-line-1'/>
Và đặt đoạn code trên vào sau nó.
+ Trường hợp 2: Bạn muốn chúng xuất hiện cuối bài viết thì:
Tìm dòng
1<div class='post-footer-line post-footer-line-1'/>
hoặc
1<div class='post-footer-line post-footer-line-2'/>
hoặc
1<div class='post-footer-line post-footer-line-3'/>
Và đặt đoạn code trên vào trước nó.
Bước 4: Các bạn tùy chỉnh lại các thông số, tên và đường link đã được bôi đỏ trong phần code ở bước 3 cho phù hợp với blog của mình nhé!
Nguồn: http://www.vanthangit.com
Chúc các bạn thành công!


